
DIY Home Repair: 10 Fixes You Can Do Without Calling a Professional
Owning a home comes with its fair share of minor headaches, from dripping faucets to squeaky doors. Before you reach for the phone to call a professional plumber or handyman, consider tackling these issues yourself. DIY home repair not only saves you hundreds of dollars but also empowers you with valuable skills. In this comprehensive guide, we’ll walk you through 10 common home fixes that require minimal tools and no advanced expertise. Whether you’re a first-time homeowner or a seasoned DIYer, these step-by-step solutions will help you maintain your space efficiently. Keywords like “DIY home repair,” “fix leaky faucet,” and “patch drywall” are woven throughout to optimize for search engines, ensuring you find exactly what you need.
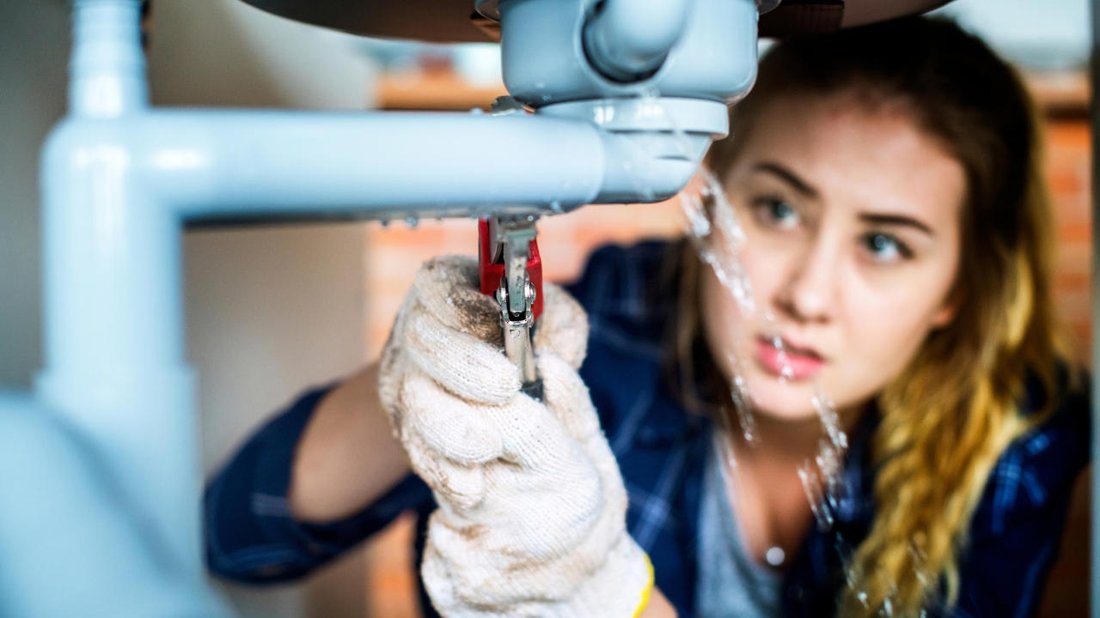
1. Fixing a Leaky Faucet
Feature Video
A dripping faucet wastes up to 3,000 gallons of water annually and can drive anyone crazy. Most leaks stem from worn-out washers or O-rings, fixable in under 30 minutes. Start by turning off the water supply under the sink. Place a towel in the basin to catch drips. Disassemble the faucet using a wrench—remove the handle, stem, and rubber washer. Replace the washer with a matching one from a hardware store (under $5). Lubricate O-rings with plumber’s grease, reassemble, and test. If it’s a cartridge-style faucet, swap the entire cartridge. This simple DIY home repair prevents water damage and lowers your utility bill. Pro tip: Address compression faucets separately, as they use different parts.
2. Unclogging a Sink Drain
Clogged drains are a kitchen nightmare, often caused by grease, hair, or food debris. Skip harsh chemicals initially; try a plunger first. Fill the sink with a few inches of water, cover the drain, and plunge vigorously for 30 seconds. No luck? Use a drain snake or zip-it tool (about $3) to pull out gunk. For stubborn blockages, pour ½ cup baking soda followed by ½ cup vinegar—let it fizz for 15 minutes, then flush with boiling water. Prevent future clogs by using a drain screen. This DIY home repair keeps plumbing flowing smoothly without toxic cleaners or plumber fees averaging $150+ per visit.
3. Patching Small Holes in Drywall

Drywall dings from doorknobs or nails are unsightly but easy to fix. For tiny holes, apply spackle with a putty knife, let dry (1-2 hours), sand smooth, and paint to match. Larger holes (under quarter-sized) need a patch: cut a square slightly larger, secure with mesh tape and joint compound. Apply three thin layers, sanding between each, then prime and paint. Tools required: putty knife, sandpaper, and drop cloth. This quick DIY home repair refreshes walls instantly, ideal for rentals or pre-sale prep. Always feather edges for seamless blending—your walls will look professionally repaired.
4. Replacing a Faulty Light Switch

Flickering or dead switches pose safety risks but are straightforward swaps. Turn off power at the breaker box—verify with a voltage tester. Remove the faceplate, unscrew the switch, and note wire positions (typically black hot, white neutral, ground green). Attach the new switch identically, secure, and restore power. Single-pole switches cost $2-5; dimmers add ambiance for $15. If you’re uncomfortable with wiring, this DIY home repair builds confidence—most homes use standard setups. Upgrade to smart switches for voice control, enhancing modern homes without electrician costs.
5. Stopping a Running Toilet

A constantly running toilet wastes 200+ gallons daily. Remove the tank lid and flush—listen for the flapper valve failing to seal. Clean mineral buildup with vinegar or replace the flapper ($5-10, universal fit). Adjust the chain if slack. For fill valve issues, turn off water, flush, and unscrew the old valve; install a new fluidmaster-style for $15. Test for silence post-repair. This essential DIY home repair is beginner-friendly, saving water and money. Check the float level too—too high causes overflow into the tube.
6. Tightening Loose Cabinet Hinges

Sagging or squeaky cabinet doors annoy daily. Inspect hinges for stripped screws. For wood cabinets, replace with 3-inch coarse-thread screws for better grip. Lubricate with WD-40 for squeaks. If holes are enlarged, fill with wooden toothpicks and glue, trim flush, then rescrew. European-style cabinets may need cam adjustments—turn the screw clockwise to tighten. This 10-minute DIY home repair restores kitchen aesthetics and function. Match finishes when buying replacements to maintain style—brass for traditional, stainless for modern.
7. Replacing a Stuck Door Knob
Sticky or loose doorknobs hinder access. Remove screws from the interior side, pull off the knob assembly. Inspect the latch mechanism; clean and lubricate with graphite powder. Install a new set ($10-20) by aligning the spindle, securing screws evenly. For privacy locks, ensure the button functions. This DIY home repair prevents lockouts and upgrades security. Choose lever-style for accessibility, especially in homes with kids or elderly. Realign strike plates if doors bind post-install.
8. Sealing Drafty Windows
Drafts raise heating bills by 10-20%. Clean window frames, then apply weatherstripping foam tape to edges. For gaps, use caulk—cut tip at 45 degrees, apply in beads, smooth with wet finger. Interior storms or shrink-wrap kits ($10) add insulation. Test with a flame or paper strip for leaks. This seasonal DIY home repair boosts energy efficiency, qualifying for rebates. Replace worn felt strips on older windows for longevity—simple fixes yield cozy comfort year-round.
9. Fixing Squeaky Floorboards
Squeaky floors signal loose boards. From above, sprinkle baby powder or talcum into seams, work in with a broom, and vacuum excess—lubricates without mess. Persistent squeaks need screws: locate joists with a stud finder, drill pilot holes, and countersink 2-inch wood screws. Fill with putty matching your floor. Under-carpet access allows shims between joists. This DIY home repair quiets homes quietly, preserving flooring integrity. Avoid nails if refinishing soon.
10. Resetting a Tripped GFCI Outlet
GFCI outlets protect against shocks; when tripped (often by moisture), press “reset.” No button? Find the source—unplug appliances—and reset the originating GFCI (kitchen/bath). Replace if faulty: turn off breaker, swap wires (test for power first). Kits cost $15. This critical DIY home repair ensures safety without electrician calls ($100+). Label panels for future ease. Regular testing monthly prevents surprises.
Mastering these 10 DIY home repair fixes transforms you from novice to capable homeowner. You’ll save thousands annually, gain satisfaction, and avoid wait times for pros. Always prioritize safety: wear gloves, use tools properly, and know limits—if structural, electrical heavy-duty, or plumbing beyond basics, call experts. Stock a basic toolkit: screwdriver set, pliers, wrench, tape measure, level, and utility knife. Watch YouTube tutorials for visuals. With practice, your home stays pristine. Share your successes in comments—what’s your go-to fix? (Word count: 1,248)