
How to Create a Family Emergency Plan: A Step-by-Step Guide
In an unpredictable world, disasters can strike without warning—whether it’s a natural calamity like a hurricane, earthquake, or flood, or a man-made crisis such as a power outage or house fire. Having a solid family emergency plan is crucial for ensuring everyone’s safety and minimizing chaos during such events. This comprehensive step-by-step guide will walk you through creating an effective family emergency plan, optimized for emergency preparedness at home. By following these actionable steps, you’ll empower your family to respond swiftly and confidently, potentially saving lives and reducing stress.
Why Your Family Needs an Emergency Plan
Feature Video
Statistics from organizations like FEMA and the Red Cross highlight that families with a pre-established emergency plan are far more likely to reunite safely and handle crises effectively. Without one, panic can lead to poor decisions, separation, and unnecessary risks. A family emergency plan addresses key areas: communication, evacuation, supplies, and recovery. It considers all members, including children, elderly relatives, pets, and those with special needs. Tailoring it to your location’s risks—such as wildfires in California or tornadoes in the Midwest—makes it even more relevant. Investing time now in how to create a family emergency plan pays dividends in peace of mind and preparedness.
Moreover, schools, workplaces, and communities often recommend or require such plans. Integrating yours with theirs creates a seamless network. Start by discussing the importance with your family; involvement fosters buy-in and reduces fear.
Step 1: Assess Your Family’s Risks and Vulnerabilities
The foundation of any robust family emergency plan is understanding potential threats. Begin by researching local hazards using resources like Ready.gov or your city’s emergency management website. Identify risks such as earthquakes, floods, severe storms, or even pandemics. Consider your home’s layout: Is it in a flood zone? Near fault lines? Multi-story?
Next, evaluate family vulnerabilities. List ages, medical conditions, mobility issues, and dependencies (e.g., medications, service animals). For instance, if a child has asthma, prioritize inhalers in your kit. Inventory your home: Do you have working smoke detectors? A fire extinguisher? Secure heavy furniture to walls to prevent tip-overs in quakes. This assessment, which should take 1-2 hours, informs every subsequent step in your family emergency plan.
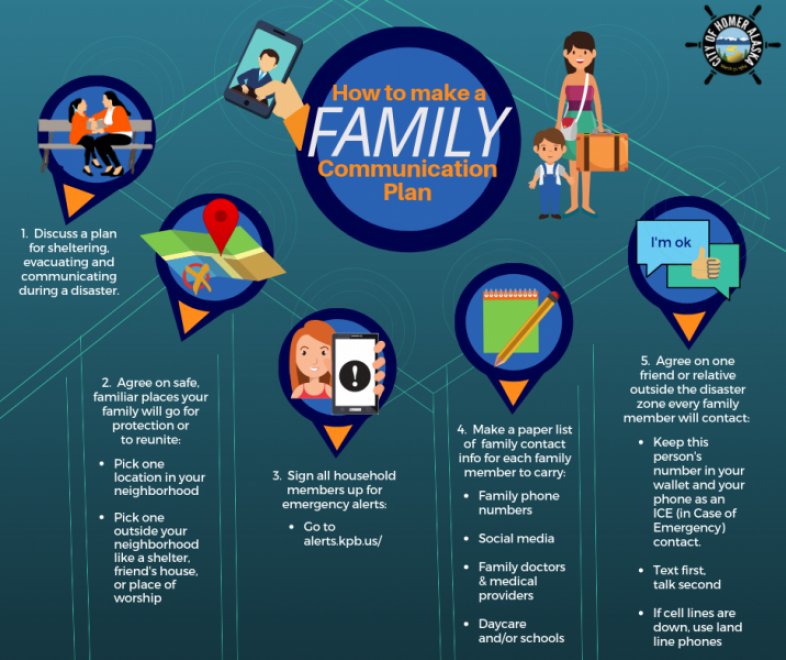
Step 2: Establish a Communication Strategy

During emergencies, cell networks overload, so a multi-layered communication plan is essential. Designate an out-of-area contact—a relative or friend not in your region—who can relay messages. Everyone memorizes or stores this number safely.
Create a family contact list with phone numbers, emails, and social media handles. Teach children to call this contact first. Use apps like WhatsApp or Zello for group texts, but have low-tech backups: paper lists in wallets, laminated cards for kids. Discuss “check-in times”—e.g., call within two hours post-event. For non-verbal members, prepare photo-based instructions or sign language phrases. Practice texting “I’m safe” codes to streamline updates. This step ensures no one is left wondering about loved ones amid chaos.
Step 3: Assemble Emergency Supply Kits

No family emergency plan is complete without “go-bags” and home kits stocked for at least 72 hours. Customize three types: individual backpacks for each person, a car kit, and a stay-at-home stockpile.
Essentials include: water (1 gallon/person/day), non-perishable food (canned goods, energy bars), flashlight, multi-tool, batteries, first-aid kit, medications (7-day supply), cash, important documents (IDs, insurance in waterproof pouch), blankets, whistle, dust masks, and sanitation items (moist towelettes, garbage bags). For kids: comfort items like stuffed animals, games. Pets need food, leash, records.
Store kits in accessible spots—hall closet, car trunk. Rotate perishables every six months. Pro tip: Use clear plastic bins for visibility. This preparation turns “what if” into “we’re ready,” a cornerstone of effective emergency preparedness.
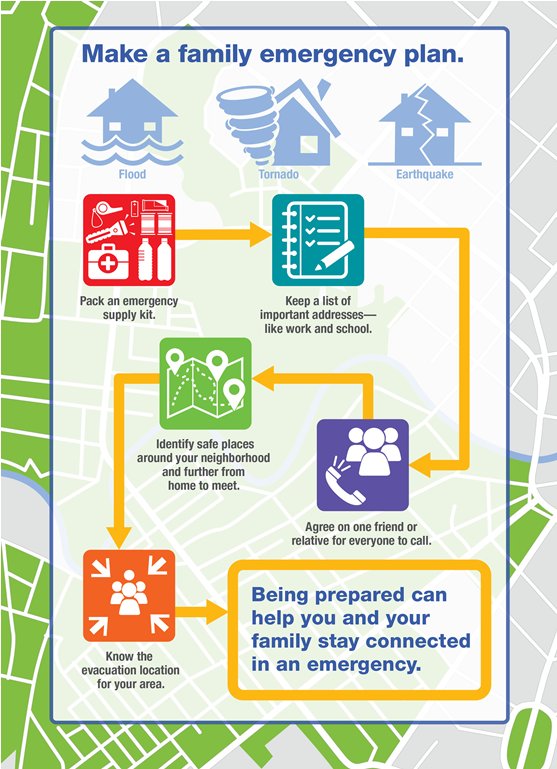
Step 4: Map Out Evacuation Routes and Safe Rooms

Visualize escape paths. Draw your home’s floor plan, marking two exits per room, assembly points outside (e.g., mailbox), and safe rooms for shelter-in-place (interior bathroom sans windows for tornadoes).
For community evacuations, identify multiple routes using apps like Google Maps or Waze in offline mode. Know shelter locations via local alerts. Account for traffic jams—have detours. Practice “crawl low under smoke” for fires. For floods, elevate valuables and know high ground. Customize for disabilities: ramps, service elevators. Print and post maps prominently. This step minimizes disorientation, a common pitfall in crises.
Step 5: Designate Roles, Meeting Points, and Reunification Procedures
Assign roles based on strengths: one parent grabs kits, another checks rooms, older kids assist siblings. Choose primary and secondary meeting spots—nearby park (in-yard fire) and out-of-neighborhood (wider disaster).
For separated scenarios, like school during quake: Kids go to school plan, then contact. Adults from work head home or meet-up. Use “decision trees”: If roads blocked, shelter in place? Include pet evacuation. For large families, buddy systems pair members. Document everything in a printed, laminated plan book—give copies to all. This clarity prevents the “every man for himself” mentality.
Step 6: Practice, Review, and Update Your Plan Regularly
A plan unused is useless. Schedule quarterly drills: tabletop exercises discussing scenarios, full walkthroughs evacuating in under 5 minutes. Time it, debrief: What worked? Involve kids with fun themes like “superhero drills.”
Annually review: Update contacts, refresh kits, adjust for life changes (new baby, move). Sign up for alerts—FEMA app, local sirens, NOAA weather radio. Integrate tech: smart home devices for shutoff valves, backup generators. After events like drills or real near-misses, refine. This iterative process keeps your family emergency plan dynamic and effective.
Additional Tips for Advanced Emergency Preparedness
Enhance your plan with tech: Battery-powered chargers, ham radios for comms blackouts, solar lanterns. Budget: Start small, $20/week builds kits fast. Community: Join CERT (Community Emergency Response Team) for training. Insurance: Review policies annually. Mental prep: Teach coping—breathing exercises reduce panic.
For specific disasters: Earthquakes—drop, cover, hold; Hurricanes—board windows; Power outages—manual can openers, cooking alternatives. Special needs: Backup power for CPAPs, sensory kits for autism.
Conclusion: Take Action Today for Tomorrow’s Safety
Creating a family emergency plan isn’t a one-off task but an ongoing commitment to safety. By following this step-by-step guide—from risk assessment to drills—you’ll build resilience against uncertainties. Download free templates from Red Cross or FEMA to jumpstart. Share your plan with neighbors for mutual aid. Remember, preparedness saves lives. Start today: Gather your family, assess risks, and craft your personalized family emergency plan. In emergencies, you’ll thank yourself.
(Word count: 1,248)